
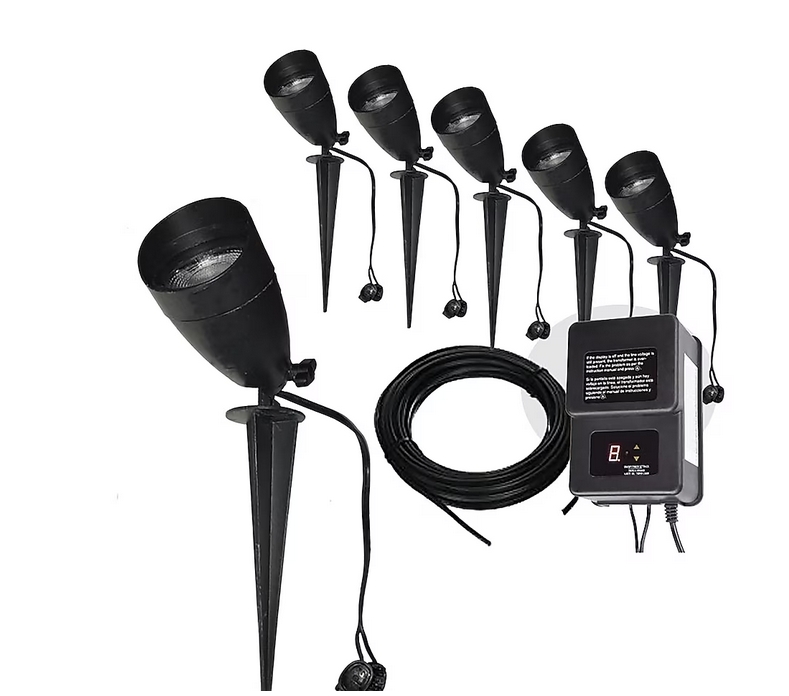
Harbor Breeze 420-Lumen 5-Watt Bronze Low Voltage Hardwired LED Spot Light Kit
- This all-in-one low voltage landscape light kit includes spot lights, transformer and cable for fast and easy set up to brighten your yard. Each kit include 6 heavy duty rust free cast aluminum 5W(430lumen) spot lights with connectors, a transformer and 50ft of cable. The 60W transformer and extra long 50ft cable has the capacity to power additional fixtures.
- Complete kit with all you need to set up your outdoor light , 60W low voltage transformer, 50 feet wire and integrated LED technology spot light provide low energy usage, high output lumen, and not light bulb to replace
- 6 Durable rust free aluminum spot lights with 8inch spike adjustable head, easy to set up, sturdy on the ground and suitable to highlight landscape/tree/building or any features high or low, 50 feet long cable allow you to cover a large area in your yard
- 60W A/C, 12V/100W transformer with photo sensor and digital timer, settings includes -on, off, auto and 1-9 hours dust to dawn setting
- Rated I P 65 – suitable for wet locations
$129.96
Finding the right light kit for your Harbor Breeze ceiling fan can really make your room pop. But with so many options to choose from, how do you know which one is the best fit for your space and needs? As a long-time Harbor Breeze owner myself, I’ve learned a thing or two about picking out the perfect light kit over the years.
In this comprehensive buying guide, I’ll walk you through everything you need to know to find a Harbor Breeze light kit that checks all your boxes. We’ll talk about critical factors like compatibility, lighting needs, style, and more. I’ll also provide tons of tips for troubleshooting common issues, figuring out wiring, and keeping your light kit looking like new.
So whether you’re looking to upgrade an existing fan or want to make sure you get the right light kit for your new Harbor Breeze install, you’ll have all the info you need by the end of this guide. Let’s get started!
Making Sure Your Light Kit Is Compatible
The first step in buying any Harbor Breeze light kit is making sure it’s actually compatible with your fan. Nothing’s worse than ordering what you think is the perfect light kit only to find out it doesn’t fit your ceiling fan model!
Harbor Breeze produces light kits that are specifically designed to fit certain fan lines and sizes. Make sure to note the fan’s model number, size, number of blades, blade span, and other specs. Then check the light kit description and specs to confirm it lists your fan as a fit.
You can also contact Harbor Breeze customer support with your fan model number to double check which light kits will work. It’s better to take a few minutes to confirm compatibility upfront instead of dealing with returns later.
If you’re modernizing an older Harbor Breeze fan, also check that the light kit mounting system is the same. Many newer light kits use easy three-screw mounts, while older fans may require help from a handyman to install kits with different mounting brackets.
Choosing Lighting Power Based on Room Use
Once you’ve narrowed down the options to light kits that fit your Harbor Breeze fan, it’s time to consider how much lighting power you need. This largely depends on the room the fan is in and what you use that room for. Think about factors like:
- Room size: Larger rooms need more powerful light kits to brightly and evenly illuminate the entire space.
- Primary room functions: Kitchens, offices, craft rooms, and other task-oriented spaces should have very bright overhead lighting. Bedrooms and living rooms can use dimmer light kits for ambiance.
- Ceiling height: Rooms with high ceilings require more powerful lights than those with standard 8-10 ft. ceilings to reach the same brightness at floor level.
As a general guide:
- Smaller rooms (~100 sq. ft.) with standard ceilings need 60-100W light kits.
- Medium rooms (~200 sq. ft.) work best with 100-150W light kits.
- Large rooms (300+ sq. ft.) with high ceilings call for 150-200W+ light kits.
Of course, personal preference matters too. If you simply want a soft glow, a lower-watt light kit might suffice even in a larger room. Take into account all factors for your space.
Choosing Light Kit Styles to Match Your Décor
You’ll also want to consider the style of your Harbor Breeze light kit based on your room’s existing décor. The finish, glass/shade style, bulbs, and other elements should complement your color scheme, furniture, and overall aesthetic.
Some popular light kit style options include:
- Finish: Oil-rubbed bronze, brushed nickel, white, antique pewter, etc.
- Glass style: Seeded, clear, frosted, white, etc.
- Bulb style: Incandescent, LED, flame-shaped, etc.
- Add-ons: Crystals, fabric shades, schoolhouse lights.
- Modern vs. traditional: Sleek metallic vs. caged filament bulbs.
Browse the various collections like the Mazon, Merrimack, and Chesapeake to find light kits that match your vision. I always recommend getting the fan first, then choosing the light kit so you can match them perfectly.
And don’t forget – you can always swap out bulbs and glass panels later to change up the look! The light kit mount will remain the same.
Troubleshooting Common Light Kit Issues
No product is immune to the occasional defect or installation mishap. If your Harbor Breeze light kit is on the fritz, try these troubleshooting tips before you contact customer support or call an electrician.
If the light kit won’t turn on, check that:
- The bulbs are securely inserted in the sockets. Screw them in tightly.
- None of the bulbs are burnt out. Replace bulbs one at a time to test.
- The wiring is securely connected. Make sure no wires are loose or improperly attached.
- The wall switch for the lights is in the “on” position.
- The circuit breaker is switched on for the light kit’s wiring.
For flickering lights, the likely culprits are:
- A loose light kit mount or canopy connection. Tighten all screws securely.
- A loose wire connection. Check the wiring at the ceiling and from the light kit into the fan.
- Old bulbs. Incandescents tend to flicker as they reach end of life. Swap in new bulbs.
- A faulty switch. Test the wall switch with another device to see if it’s the problem.
Following basic troubleshooting steps can solve most minor issues. But if you still have problems, time to call in a pro!
Finding Replacement Parts and Repair Help
Like any electrical fixture, Harbor Breeze light kit components can wear out or break over time. Luckily, replacement parts are easy to find online or at local home improvement stores.
The most commonly needed repairs and replacements include:
- Bulbs: Check the base type and wattage on old bulbs to match new ones. LEDs last 5-10 years.
- Glass panels or lampshades: Search using the model number and size to find exact matches.
- Mounting hardware: Kits are sold with additional screws, washers, caps, etc.
- Wiring: Generic mounting wires and connectors work for repairs. Record colors and locations.
- Full kits: If multiple components are broken, just replace the whole kit.
Professional help may be needed for major repairs like replacing the light kit mounting bracket. And always turn off power at the breaker before repairs involving wiring.
Cleaning Your Light Kit for Peak Performance
To keep your Harbor Breeze light kit looking like new and lighting up your room at max brightness, be sure to clean it every few months. Follow these tips:
- Use a duster wand to remove dust and debris from metal surfaces and glass panels.
- Gently wipe down glass panels, shades, and bulbs with a microfiber cloth and warm, soapy water. Avoid harsh cleaners.
- For deeper cleaning, take panels off the fan to clean both sides and the fixture base.
- Scrub caked-on dirt with a soft brush and baking soda paste. Rinse and dry completely.
- Check and tighten all screws, mounts, clips and wiring for optimal electrical contacts.
Pro tip: schedule cleanings with ceiling fan blade dustings and motor cleanings so everything looks tip top! A well-maintained light kit has no flickering issues and maintains high light output.
Picking the Perfect Low-Profile Light Kit
If you have a room with a low ceiling, a flushmount or semi-flushmount light kit is a great option to maximize airflow and visual space while still getting ample light. Here are my top picks under 10 inches tall:
- Harbor Breeze Mazon: Sleek frosted glass shade sits nearly flush with 9.75 in height. Available in bronze, brushed nickel and white finishes.
- Harbor Breeze Beach Creek: Island-inspired 8-inch light kit with seeded glass panel. Oil-rubbed bronze finish.
- Harbor Breeze Twin Breeze I: Two-light semi-flush kit with white glass panels. Low 9-inch profile.
- Harbor Breeze Merrimack: Schoolhouse-style with clear glass panels and vintage filament-style LEDs. 8 inches high.
Look for shorter downrod lengths too – 12 inches or under helps the fan itself sit lower. Measuring the room height is the best way to confirm the kit and fan combo will fit below the ceiling.
Learning to Love Changing Light Bulbs
It’s inevitable – light bulbs will burn out over time and need changing. With Harbor Breeze light kits, the good news is it’s a breeze to swap bulbs when needed. Just remember:
- Turn off power at the wall switch before changing bulbs.
- Wait for bulbs to cool completely to avoid burns. Don’t handle halogen bulbs with bare hands.
- Inspect the old bulb to ensure it’s actually burnt out. Check for broken filaments.
- Match wattage and bulb style of new bulbs to the old. Review any markings on the fixture.
- Handle new bulbs gently at the base and clean with a soft cloth before installing. Don’t touch the glass.
- Screw in bulbs snugly but don’t over tighten. Angle the pins on the base properly into the sockets.
- Restore power and test the new bulbs. Replace immediately if flickering or other issues occur.
Keep spare bulbs on hand so you can replace them right away. Frequent burning out can also indicate electrical issues, so take note if it happens repeatedly.
Demystifying Light Kit Warranties
Understanding the warranty coverage on your Harbor Breeze light kit can give you peace of mind should issues arise. Here’s what to expect:
- 1-year limited warranty from date of purchase. Covers manufacturer defects on the light kit itself.
- Wiring, mount, and electrical parts 5-10 years. Covers repair/replacement of wiring, corrosion, shorts.
- Blades excluded. Bulbs and glass panels expected to be replaced over time.
- Return to store with proof of purchase for replacement of defective parts.
- Labor costs not covered if pro install/repair needed.
Register your warranty for easiest support. And know that even out of warranty, replacement parts are readily available from Harbor Breeze and third parties.
Decoding Light Kit Wiring
Installing or repairing a light kit inevitably involves dealing with wiring. While it’s ideal to have a pro handle the electrical work, understanding the basics can be helpful for troubleshooting.
Key light kit wiring facts:
- Two wires bring power up to the light kit – neutral (usually white) and hot (black).
- A ground wire connects to the green screw or plate for safety.
- Wires from the fan motor also connect into the wiring for the pull chain switches.
- Additional wires lead from the kit into the switch housing for the light power control.
- diagrams or labels inside the kit show expected wire connections.
The ceiling-to-kit and separate kit-to-switch wire sets are distinctive once you know what to look for. Overall, ensuring tight, secure connections is the key to flawless function!
Harnessing the Power of LEDs
One of my favorite modern upgrades is switching over to LED light bulbs in Harbor Breeze light kits. LEDs offer impressive benefits:
- Super long lifespan – up to 50,000 hours! Years without needing to change bulbs.
- Big energy savings – uses 75% less power than incandescents.
- Cool operation – LEDs produce very little heat.
- Mercury-free – safer for the environment.
- Great color quality – warm glow without the harshness of fluorescents.
- Dimmable – many LED bulbs can be paired with dimmer switches.
Just be sure to match the wattage requirements and choose omni-directional bulbs designed for ceiling fans. The light color should also complement your room décor and activities. Making the LED switch is the ultimate way to upgrade your light kit sustainably!
Pulling Off a Seamless Light Kit Upgrade
Even though Harbor Breeze designs its light kits to seamlessly integrate with their ceiling fans, switching to a new light kit brand isn’t out of the question. A few tips to make a smooth transition:
- Stick to the same size and shape light kit – don’t leave gaps in the mounting area.
- Match the mounting bracket type – most fans use standard 3-screw mounts.
- If wiring colors don’t align, use caps and electrical tape for a safe install.
- Choose a comparable wattage range for the room’s lighting needs.
- Test the light kit thoroughly before finalizing the install to check for issues.
- Choose a style that aesthetically complements both the fan and your décor.
As long as you do your homework to ensure compatible sizing, wiring, and wattage, there’s no reason another light kit brand can’t pair perfectly with your Harbor Breeze ceiling fan. But their own light kits are always a safe bet!
Finding Your Light Kit’s Hidden Model Number
Trying to troubleshoot or replace a broken component, but can’t find the model number on your Harbor Breeze light kit? Check these sneaky spots where it may be hiding:
- Inside the mounting bracket or canopy, printed on a sticker or metal plate
- On the wiring label attached to the wiring harness
- Printed directly on the socket housing
- On the inside frame of the glass fixture
- Inside the light kit box if you still have it
You may need to take the glass or shade off to access printed info inside the fixture. If you can’t locate it, customer support can help identify the model using other distinct markings.
Knowing the exact model number makes finding compatible replacement parts and troubleshooting specs a breeze! Never throw away the original box or paperwork.
Essential Tools for DIY Installation
Installing a new Harbor Breeze light kit is totally DIY-friendly as long as you have the right tools:
- Wire strippers to remove insulation from wiring
- Ladder to reach the ceiling safely
- Electrical tape for insulating wires
- Screwdrivers (flathead and Phillips) for the mount screws
- Voltage meter to test connections
- Wire nuts to join wires together
- Stud finder to locate mounting points in ceiling
- Gloves and eyewear for safety
And of course – make sure the power is shut off at the breaker before doing any electrical work! Having the necessary tools on hand will make installation much smoother.
Bottom Line
I hope this comprehensive guide gives you all the nitty gritty details about Harbor Breeze light kits – from picking the perfect one to trouble-free installation. The key is doing your homework to find a light kit that fits your fan model, lighting needs, style and budget.
I’m happy to answer any other questions! Let me know if you need help finding replacement parts down the road or want recommendations on upgrades like LED bulbs. Here’s to a beautifully bright ceiling fan in your future!