
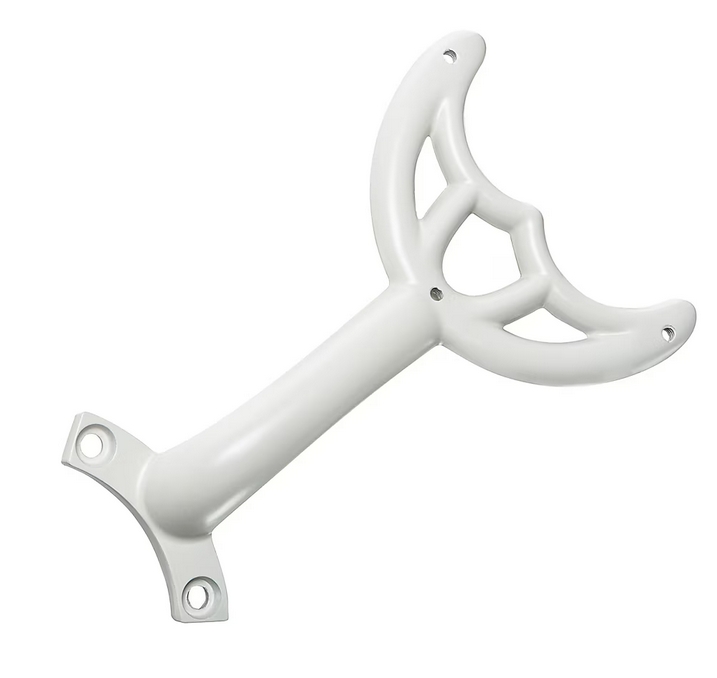
Harbor Breeze 5 -Pack 4.52-Inches Ceiling Fan Blade Arm
- Harbor Breeze 52-in white blade irons
- Replacement blade irons
- Easy to install
- Installation is simple
- Five white ceiling fan blade arms
- Easy to replace
$23.98
Navigating the World of Ceiling Fan Repairs with Confidence
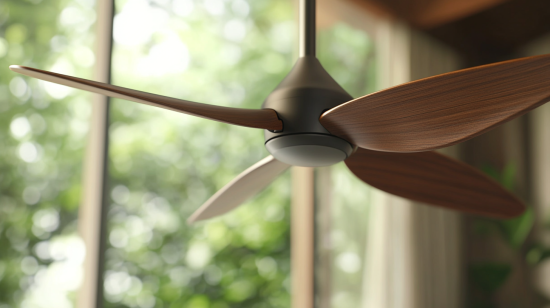
As I stood on my wobbly step ladder, staring up at my once-beautiful Harbor Breeze ceiling fan with its now slightly askew blade, I couldn’t help but wonder how such a small component could cause such a big headache. That annoying wobble had graduated to a concerning rattle, and I knew it was time to address the real culprit: a damaged blade arm. What followed was my deep dive into the world of Harbor Breeze fan blade arms—a journey I’m sharing with you today to save you from the confusion and frustration I initially faced.
Understanding the Essential Role of Fan Blade Arms
Fan blade arms might seem like simple components, but they’re actually crucial to your ceiling fan’s performance. The quality of your Harbor Breeze fan blade arms directly affects both the functionality and safety of your ceiling fan. These unassuming metal brackets connect the motor housing to the decorative blades, allowing for proper rotation while maintaining the correct angle for optimal airflow.
When I first noticed my fan’s wobble, I mistakenly thought the blade itself was the problem. It wasn’t until I took a closer look that I realized the connecting arm had become slightly bent—likely from an enthusiastic dusting session gone wrong (we’ve all been there). This small imperfection was causing the entire system to become unbalanced, creating that annoying wobble and potentially shortening my fan’s lifespan.
Harbor Breeze fan blade arms serve three critical functions. First, they provide structural support, ensuring the blades stay securely attached to the motor. Second, they maintain the proper pitch (or angle) of each blade, which is essential for moving air efficiently. And third, they contribute to the overall aesthetic of your fan, completing its design with various finishes and styles.
Finding the Right Replacement Harbor Breeze Fan Blade Arms
When it came time to replace my damaged arm, I quickly discovered that finding the right part wasn’t as straightforward as I’d hoped. Harbor Breeze is a house brand sold exclusively through Lowe’s, but their replacement parts aren’t always readily available in stores. After some research and a bit of trial and error, I found several reliable sources for genuine replacement parts.
Your first stop should be Lowe’s, both in-store and online. Many locations keep common replacement parts in stock, and their website offers an expanded selection. I found that bringing in my damaged arm was helpful for in-store assistance, as the staff could visually match it. The Lowe’s website also allows you to search by your specific fan model, which can eliminate much of the guesswork.
If Lowe’s doesn’t have what you need, manufacturer websites can be your next best option. Harbor Breeze fans are manufactured by a company called Litex Industries, and they sometimes offer replacement parts through their customer service channels. When I called their helpline (found in my fan’s manual), they were able to direct me to the exact part I needed.
For older fan models, I’ve found that Amazon and eBay often have both OEM (Original Equipment Manufacturer) and compatible aftermarket options. Just be sure to carefully check measurements and specifications before purchasing, as third-party replacements may not always be perfect matches.
The Art of Measuring Fan Blade Arms Correctly
One of the most critical steps in replacing Harbor Breeze fan blade arms is getting the measurements right. Even slight differences can affect your fan’s balance and performance. After making an error with my first replacement attempt, I developed a methodical approach to measuring that hasn’t failed me since.
Start by measuring the length of the arm from the center of the mounting hole at the motor end to the center of the mounting hole at the blade end. This is your primary dimension and typically ranges from 3 to 7 inches for most Harbor Breeze models.
Next, measure the distance between mounting holes at both ends. Some arms have multiple holes for adjustability, so be sure to note the specific configuration of your current arms. I also recommend measuring the thickness of the metal and the width of the arm, as these dimensions can affect compatibility.
Don’t forget to note the angle or pitch of the arm. This is harder to measure precisely at home, but you can get a general sense by placing the arm on a flat surface and observing the angle it creates. Taking clear photos from multiple angles also helps when shopping for replacements.
Material Matters: What Harbor Breeze Fan Blade Arms Are Made From
Harbor Breeze fan blade arms come in various materials, each with distinct advantages. Most models use painted or powder-coated steel for durability and strength. These have served me well in most applications, providing a good balance of weight and stability.
Higher-end models might feature arms made from die-cast zinc alloy or even aluminum. These premium materials offer excellent durability with reduced weight, which can improve energy efficiency and reduce strain on the motor. I upgraded to die-cast arms for my living room fan and noticed a definite improvement in both stability and quietness.
For outdoor or damp-rated Harbor Breeze fans, look for arms with additional weather-resistant coatings or made from stainless steel. When I installed a fan on my covered patio, I made sure to select arms specifically rated for outdoor use to prevent rusting and corrosion.
Whatever material you choose, pay attention to the finish. Most Harbor Breeze arms come in standard finishes like brushed nickel, oil-rubbed bronze, matte black, or white. I’ve found that matching this finish to your existing fan components creates the most cohesive look.
The Universality Question: Are Harbor Breeze Fan Blade Arms Interchangeable?
One of the most common questions I had (and now receive from friends tackling similar projects) is whether Harbor Breeze fan blade arms are universal. The short answer is no—but with some caveats.
Harbor Breeze fan blade arms are generally designed to work with specific fan models or families of models. However, there is some interchangeability within the brand, especially among fans of similar size and vintage. I’ve successfully used arms from one Harbor Breeze model on another when the dimensions matched perfectly.
The key factors determining compatibility include the mounting hole pattern at the motor end, the length of the arm, and the blade mounting configuration. If all these match, there’s a good chance the arms will work, even if they’re technically from different models.
Cross-brand compatibility is more challenging but not impossible. I’ve occasionally found that arms from brands like Hunter or Hampton Bay can work with Harbor Breeze fans if the dimensions are identical. However, this should be considered a last resort, as even minor differences can affect performance and safety.
The Installation Process: Replacing Harbor Breeze Fan Blade Arms Step by Step
After gathering my replacement arms, I developed a systematic approach to installation that minimizes the risk of error. While I’m not a professional electrician, I’ve now replaced fan blade arms in multiple homes and have refined the process to be as straightforward as possible.
First and most importantly, safety precautions cannot be overlooked. Always turn off power to the fan at the circuit breaker—not just using the wall switch or remote. I verify the power is off by attempting to turn on the fan before starting work.
To replace the arms, you’ll typically need to remove the blades from the existing arms first. This usually involves removing several small screws per blade. I recommend using a magnetic screwdriver and working methodically, storing all screws in labeled containers to avoid confusion.
Once the blades are detached, you’ll remove the arms from the motor housing. Depending on your fan model, this might involve removing screws from underneath a decorative cap or directly accessing mounting screws on the side of the motor housing. I take photos before disassembly to reference during reassembly.
Installation is essentially the reverse process, but with careful attention to alignment. I install all arms loosely at first, then gradually tighten all connections only after everything is properly aligned. This prevents stress on any single component and helps ensure proper balance.
Common Issues and Troubleshooting Harbor Breeze Fan Blade Arms
Even with careful selection and installation, issues can arise with Harbor Breeze fan blade arms. Over the years, I’ve encountered several common problems and developed effective solutions for each.
Wobbling remains the most frequent complaint even after replacing arms. In my experience, this usually stems from one of three causes: improper tightening of screws, misaligned arms, or arms of slightly different weights. To address this, I carefully check that all screws are equally tight, use a level to verify arm alignment, and occasionally add small balancing clips (available in fan balancing kits) to compensate for minor weight differences.
Noise issues often accompany wobbling but can also occur independently. Clicking or scraping sounds typically indicate that an arm is making contact with another component during rotation. I’ve fixed this by slightly adjusting the arm position or, in some cases, carefully bending the arm away from the contact point.
Compatibility issues are frustrating but usually apparent during installation. If mounting holes don’t align perfectly or the arm creates an unusual angle when installed, it’s best to stop and find a more appropriate replacement rather than forcing components together.
The Aesthetic Angle: Customizing Harbor Breeze Fan Blade Arms
One aspect of replacement I particularly enjoy is the opportunity to update the look of my fan. Harbor Breeze fan blade arms can be customized to change or enhance your fan’s appearance, even if the original finish has been discontinued.
Painting Harbor Breeze fan blade arms is entirely possible with the right approach. I’ve successfully refinished metal arms using a process that involves light sanding, applying a metal primer, and finishing with spray paint designed for metal surfaces. This has allowed me to coordinate fans with updated room décor without replacing the entire fixture.
For a more dramatic change, replacing standard arms with decorative ones can transform the entire look of your fan. Harbor Breeze offers several decorative arm styles with scrollwork or embellishments that add character. I upgraded a plain fan in my guest room with decorative arms, and visitors frequently comment on what they assume is a new, premium fixture.
If you’re concerned about matching existing components, take an existing arm to paint supply stores where they can color-match the finish. I’ve done this successfully with both matte and metallic finishes.
Cost Considerations: Budgeting for Harbor Breeze Fan Blade Arms
The cost of replacement Harbor Breeze fan blade arms varies widely based on several factors that I’ve learned to consider before making a purchase.
OEM (Original Equipment Manufacturer) arms typically range from $8 to $25 per arm, depending on the model and material. Since most fans have 3-5 blades, a complete set could cost between $24 and $125. I’ve found that mid-range models usually require arms in the $12-15 range.
Aftermarket or universal arms tend to be less expensive, often costing $5-15 per arm. However, these savings come with the potential risk of imperfect fit or finish matching. When I opted for aftermarket arms for a rarely used fan in my home office, the small color variation was acceptable given the significant cost savings.
Complete arm sets are often more economical than buying individual arms. Many manufacturers offer discounted pricing when purchasing a full set, which also ensures uniform appearance and balance. Even if only one arm is damaged, I typically replace all arms simultaneously to maintain consistent wear patterns and appearance.
Shipping costs can significantly impact total price, especially when ordering directly from manufacturers. I try to combine orders or find free shipping options whenever possible. Local purchases eliminate shipping costs but may have limited selection.
Warranty Considerations for Harbor Breeze Fan Blade Arms
Understanding the warranty coverage on replacement Harbor Breeze fan blade arms has saved me both money and frustration on several occasions.
Most new Harbor Breeze fans come with a limited lifetime warranty on the motor and a 1-3 year warranty on other parts, including blade arms. However, this warranty coverage typically applies only to the original purchaser and requires proof of purchase. When my relatively new fan developed a defective arm, the manufacturer replaced it at no cost after I provided my receipt and model information.
Replacement parts purchased separately usually come with their own limited warranty, typically 90 days to 1 year. I always keep packaging and receipts for these purchases until well after the warranty period ends.
It’s worth noting that improper installation or use can void warranties. I learned this the hard way after attempting to modify an arm to fit a different model—the manufacturer rightfully refused my warranty claim since I had altered the original part.
For older fans where warranties have expired, third-party parts often provide the best value, even if they come with more limited warranty coverage. I’ve had good experiences with several aftermarket suppliers who stand behind their products with 30-day satisfaction guarantees.
Professional vs. DIY Installation: Making the Right Choice
While I enjoy the satisfaction of completing repairs myself, I’ve learned to recognize when a project might be better handled by a professional. Fan blade arm replacement falls into a middle ground of DIY projects—straightforward enough for most homeowners but with enough potential complications to warrant careful consideration.
DIY installation is generally appropriate if you have basic tools (screwdrivers, pliers, and possibly a socket set), are comfortable working on a ladder, and have successfully completed similar household projects. My first replacement took about 90 minutes, but now I can complete the task in under 30 minutes.
Professional installation makes sense for several scenarios I’ve encountered. If your fan is installed on a very high ceiling, requires special tools for access, or if you’re replacing arms as part of a larger electrical issue, hiring a professional is the safer choice. I opted for professional help with my cathedral ceiling fan, and the peace of mind was worth the $75-150 service fee.
If you choose the DIY route, I strongly recommend having a helper to assist with holding components and steadying the ladder. Working with a partner has prevented several potential accidents in my experience.
Extending the Life of Your Harbor Breeze Fan Blade Arms
After investing time and money in replacement arms, I developed several practices to maximize their lifespan and maintain optimal performance.
Regular cleaning is perhaps the most important preventive measure. Dust accumulation not only looks unsightly but can also add weight to one side of the fan, causing imbalance. I gently wipe my fan arms with a microfiber cloth every few months, taking care not to apply pressure that might bend the arms.
Periodic inspection has caught several potential issues before they became serious problems. Every six months, I turn off the fan and check for any loose screws, signs of corrosion, or slight bending in the arms. Addressing these minor issues immediately prevents them from worsening.
For fans in high-humidity areas like bathrooms or covered patios, I apply a thin coat of furniture wax to metal arms once a year to provide additional protection against moisture and corrosion. This simple step has noticeably extended the life of these more vulnerable installations.
Seasonal reversal of fan direction (clockwise in winter, counterclockwise in summer) promotes balanced wear on all components, including the arms. I change my fans’ direction with the seasons both for energy efficiency and to ensure no single side faces more stress over time.
The Environmental Impact of Replacement Parts
As someone increasingly conscious of sustainability, I’ve come to appreciate how replacing just the blade arms—rather than the entire fan—significantly reduces environmental impact.
By focusing on the specific failed component, we keep functional motors, housing units, and electronic controls out of landfills. I estimate that my most recent arm replacement used less than 5% of the materials that would have been required for a complete fan replacement.
For the environmentally conscious, seeking recycled or refurbished arms is an option worth exploring. Several online marketplaces specialize in salvaged fan parts. While selection may be limited, these platforms can be excellent resources for discontinued models or vintage fans.
When disposing of old arms, check with local recycling facilities about metal recycling options. Most Harbor Breeze arms are made from recyclable metals that can be reclaimed if properly processed. I separate all metal components before disposal to facilitate this recycling process.
Conclusion: Making Informed Decisions About Harbor Breeze Fan Blade Arms
My journey through the world of Harbor Breeze fan blade arms has transformed what was once an intimidating repair into a manageable and even satisfying home maintenance task. From understanding the crucial role these components play to successfully selecting, installing, and maintaining them, I’ve gained confidence that I hope to pass along to you.
Remember that the quality of your Harbor Breeze fan blade arms directly affects both the functionality and safety of your ceiling fan. Taking the time to select the right replacement, measure correctly, and install properly will reward you with years of quiet, efficient operation.
Whether you’re addressing a wobbly fan, updating your home’s aesthetic, or simply performing preventive maintenance, understanding these often-overlooked components empowers you to make informed decisions. Rather than replacing an entire functioning fan because of one damaged arm, you can now confidently pursue the more economical and environmentally friendly option of component replacement.
As with many home repairs, patience and attention to detail make all the difference. Document your specific model information, take photos before disassembly, and work methodically. With the guidance provided in this comprehensive buying guide, you’re well-equipped to navigate the world of Harbor Breeze fan blade arms with confidence and success.
And the next time you look up at your ceiling fan spinning silently and smoothly above you, you can enjoy not only the comfortable breeze but also the satisfaction of having mastered yet another home maintenance challenge.