
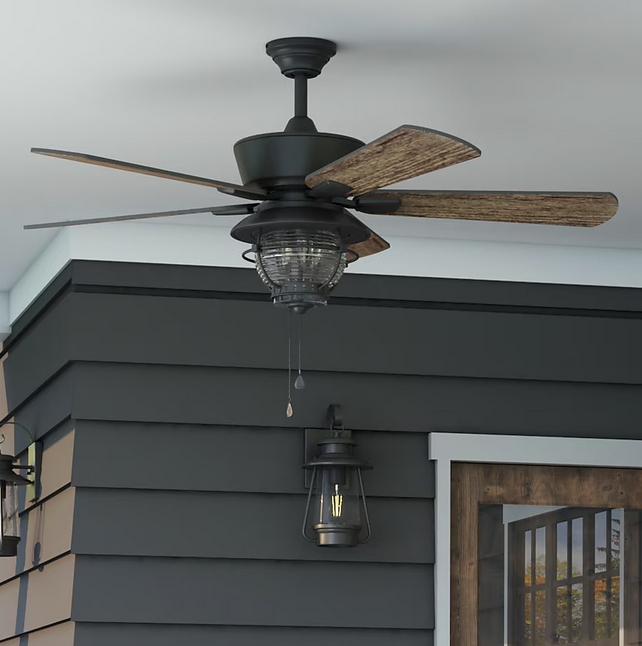
Harbor Breeze Merrimack II 52-in Bronze with Driftwood/Auburn Blades LED Indoor/Outdoor Ceiling Fan with Light (5-Blade)
- The Harbor Breeze Merrimack II is a 52 inch outdoor ceiling fan with lights perfect for your rustic farmhouse spaces. This ceiling fan features a lantern inspired led light kit, 5 reversible barnwood style blades and a sturdy steel body that comes in bronze, white, galvanized and matte black finishes. It can be mounted several ways and can be used in both indoor and covered outdoor spaces. With its 3 speed, reversible motor, this pull chain controlled fan will provide a cool breeze and comforting air circulation all year long. Harbor Breeze ceiling fans provide style, function, and illumination to help make your house a home.
- Outdoor ceiling fan is ETL listed as damp rated and can be hung indoors and in covered outdoor spaces such as patios, porches, and garages
- Dual-mount ceiling fan can be hung from standard or angled ceilings using the 6-in downrod that is included
- Easy-to-use pull chains are included for quick adjustments to the light and speed settings
- Clear seeded glass globe light kit with cage includes 3 dimmable E26/B11 LED bulbs
- Bronze ceiling fan from the Merrimack collection features 5 reversible driftwood and auburn blades
- 52-in fan provides airflow up to 4666 CFM, making it ideal for large rooms up to 400 sq ft
- Reversible 3 speed motor efficiently circulates cool air in the summer and warm air in the winter, cutting down on energy costs
- Unique design transcends several decor styles from industrial or rustic farmhouse to coastal/waterfront
- Limited lifetime warranty
$169.00
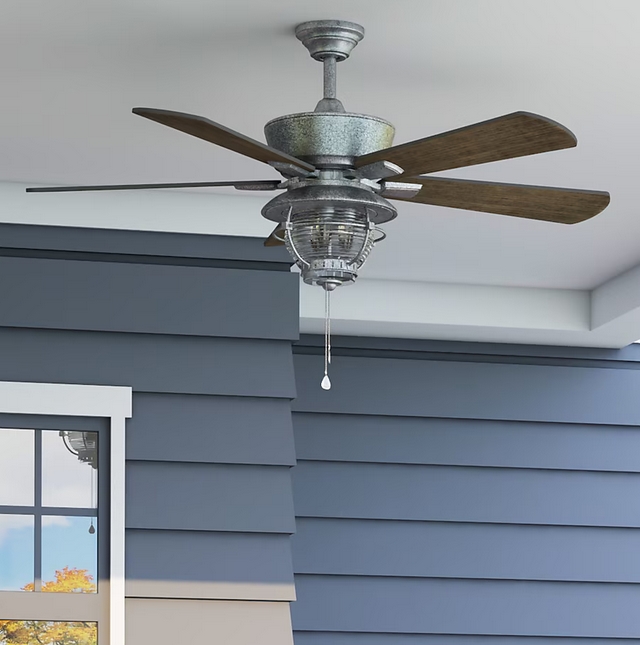
Harbor Breeze Merrimack II 52-in Galvanized with Driftwood/Espresso Blades LED Indoor/Outdoor Ceiling Fan with Light (5-Blade)
- The Harbor Breeze Merrimack II is a 52 inch outdoor ceiling fan with lights perfect for your rustic farmhouse spaces. This ceiling fan features a lantern inspired led light kit, 5 reversible barnwood style blades and a sturdy steel body that comes in bronze, white and galvanized finishes. It can be mounted several ways and can be used in both indoor and covered outdoor spaces. With its 3 speed, reversible motor, this pull chain controlled fan will provide a cool breeze and comforting air circulation all year long. Harbor Breeze ceiling fans provide style, function, and illumination to help make your house a home.
- Outdoor ceiling fan is ETL listed as damp rated and can be hung indoors and in covered outdoor spaces such as patios, pergolas, garages, and breezeways
- Multi-position ceiling fan can be hung flush with the ceiling where more walk-through space is needed, from standard ceilings with a 6-in downrod (included) or from angled ceilings (angle bracket sold separately)
- Easy-to-use pull chains are included for quick adjustments to the speed settings and light output
- Clear seeded glass globe light kit with cage includes 3 dimmable E26/B11 LED bulbs
- Galvanized ceiling fan from the Merrimack collection features 5 reversible driftwood and espresso blades
- 52-in fan provides airflow up to 4666 CFM, making it ideal for large rooms up to 400 sq ft
- Reversible 3 speed motor efficiently circulates cool air in the summer and warm air in the winter, cutting down on energy costs
- Unique design transcends several decor styles from industrial or rustic farmhouse to coastal/waterfront
- Limited lifetime warranty
$119.98
Finding the perfect ceiling fan for your home can be a daunting task. With so many options on the market, how do you know which one is right for you? Look no further than the Harbor Breeze Merrimack – one of the most popular and highly-rated ceiling fans available today.
In this comprehensive buying guide, we’ll walk through everything you need to know about Harbor Breeze Merrimack ceiling fans. We’ll cover how to install, features, troubleshooting tips, cleaning instructions, light bulb replacement, warranty info, balancing, specifications, direction reversal, pricing, assembly, common problems, speed control, replacement parts, remotes, airflow efficiency, wiring, and more.
How to Install a Harbor Breeze Merrimack Ceiling Fan
Installing a Harbor Breeze Merrimack ceiling fan is a relatively straightforward process, though professional installation is recommended if you’re uncomfortable working with electrical wiring.
Here are the basic steps for installing a Merrimack ceiling fan:
- Turn off power at the circuit breaker and remove existing light fixture if there is one.
- Mount the ceiling fan bracket to the ceiling junction box using the provided hardware. Make sure it is securely installed into a beam or support.
- Lift the fan assembly onto the ceiling mount bracket and secure it with the provided screws and lock washers.
- Connect the wires from the ceiling to the wires on the fan assembly, matching color to color. Connect the green grounding wires.
- Tuck the connected wires safely into the canopy housing and attach the canopy to the ceiling mount bracket.
- Attach the fan blades to the blade arms using the provided blade screws.
- Install light kit if your fan comes with one. Screw in light bulbs.
- Turn power back on at the breaker. Use the pull chains to operate fan speeds and light.
And that’s it – you now have a brand new Harbor Breeze Merrimack ceiling fan installed and ready to keep you comfortable!
Where to Buy a Harbor Breeze Merrimack Ceiling Fan
You can find Harbor Breeze ceiling fans at most major home improvement stores, lighting showrooms, and online retailers. Some of the best places to buy a Merrimack ceiling fan include:
- Home Depot – Large selection of Harbor Breeze fans available online and in most stores. Offer free shipping on orders over $45.
- Lowe’s – Another home improvement giant that carries Harbor Breeze. Price match guarantee and free in-store pickup.
- Amazon – Convenient shipping and a wide assortment of Merrimack fans eligible for Prime and free returns.
- Wayfair – Great prices on Harbor Breeze ceiling fans with discounted shipping on most orders.
- Overstock – Inventory of Merrimack models and styles. Get free shipping on thousands of items.
- Walmart – Brick-and-mortar stores have a limited selection but you can find more online. Free 2-day shipping with Walmart+ membership.
- Harbor Breeze website – Browse the full Harbor Breeze product line directly from the manufacturer.
No matter where you choose to purchase, be sure to comparison shop across retailers for the best price, promos, and availability.
Features of the Harbor Breeze Merrimack Ceiling Fan
What sets the Harbor Breeze Merrimack apart from other ceiling fans on the market? Here are some of the great features and specs:
- Quiet, reversible motor – Designed for quiet operation and reverse capabilities for seasonal air circulation.
- Integrated LED light kit – Energy efficient LED light kit included in most models to provide extra illumination.
- Remote control – Handheld remote allows you to control fan speed and lights from anywhere in the room.
- 3 fan speeds – Low, medium and high settings optimally control air flow.
- Damp rating – Rated for use in covered outdoor locations like porches and patios.
- Blade pitch adjustment – Easily customize blade pitch to your desired airflow level.
- Angled head – Sloped fan head provides greater airflow coverage in rooms with angled or vaulted ceilings.
- Limited lifetime warranty – Motor and parts protected against defects for life of the fan.
With features like these, it’s easy to see why the Merrimack remains one of the bestselling Harbor Breeze fans year after year.
Troubleshooting Harbor Breeze Merrimack Ceiling Fans
Like any appliance, issues can arise with Harbor Breeze ceiling fans after prolonged use. Here are some common problems and troubleshooting tips:
- Fan not starting – Check circuit breaker, wiring connections, remote battery. Make sure power switch is on.
- Noisy operation – Tighten blade screws, check motor mount, clean fan blades, lubricate moving parts.
- Wobbling – Balance blades, tighten mounting bracket, make sure ceiling box is secure.
- Lights not working – Replace burnt out bulbs, check wiring and connector plugs, test remote control battery.
- Remote not working – Replace remote control battery, reprogram/resync remote, check antennae.
- Fan speed issues – Check remote, reverse switch positions, test fan speed settings.
- Intermittent issues – Could be loose wiring connections, check all wires and wire nuts.
Be sure to consult the user manual for more fan-specific troubleshooting advice. Contact customer support if problems persist after trying basic fixes.
How to Clean a Harbor Breeze Merrimack Ceiling Fan
Regular cleaning keeps your Harbor Breeze Merrimack fan looking its best. Follow these steps:
- Turn off power to fan at breaker.
- Use soft brush or microfiber cloth to gently dust fan blades. Vacuum crevices.
- Dampen cloth with mild soap and water solution. Wipe blades, housing, controls.
- Dry all parts thoroughly with towel. Be careful not to get metal parts wet.
- Remove glass shades and bulb covers. Clean gently with soap and water. Dry completely.
- Replace light bulbs as needed. Check for dust buildup on bulbs and fixtures.
- Use small vacuum brush to remove dust and debris from motor housing vents and light kit.
- Replace light covers, shades, and bulbs. Restore power when fully dry.
Deep clean as needed 1-2 times per year. Avoid harsh chemicals, abrasives, and excessive moisture to prevent damage. Your fan will provide optimized airflow when cleaned regularly.
How to Replace the Light Bulb in a Harbor Breeze Merrimack Ceiling Fan
Need to replace a burned out light bulb in your Harbor Breeze Merrimack ceiling fan? Follow these quick steps:
- Turn off power to the fan at the circuit breaker.
- Remove the glass shade or light cover from the light fixture. This is usually held in place by screws or clips.
- Remove old light bulb by gently unscrewing it counterclockwise. Discard old bulb properly.
- Check that the new replacement bulb matches the wattage listed on the socket. DO NOT exceed the recommended wattage.
- Carefully insert the new bulb by screwing it in clockwise until tightened securely. Be careful not to overtighten.
- Replace the light cover and glass shade. Twist and lock into place if applicable.
- Restore power to the ceiling fan at the breaker.
- Test new light bulb by turning on the light switches.
Remember to always switch off power supply before replacing light bulbs in your Merrimack ceiling fan. Only use bulbs that match the socket type and wattage to prevent damage.
Harbor Breeze Merrimack Ceiling Fan Warranty Info
One of the great benefits of purchasing a Harbor Breeze ceiling fan is the included limited lifetime warranty. Here are some key facts about the warranty coverage:
- Motor – Lifetime limited warranty covers defects in materials and workmanship on the fan motor.
- Other Parts – Light kits, blades, controls, etc. are warranted for 1 year from original purchase date.
- Labor – No warranty on labor costs for installation, repair, or replacement work.
- Warranty Provider – Harbor Breeze/Hinkley Lighting handles all warranty claims.
- Proof of Purchase – Original receipt date required for warranty claim requests.
- Service Process – Contact Harbor Breeze support online or by phone for troubleshooting. If unable to resolve, submit warranty claim with proof of purchase.
- Exclusions – Damage from improper installation, accidents, repair work, normal wear/tear are not covered.
- Shipping Costs – Customer responsible for shipping charges to send products for warranty evaluation/service.
Be sure to register your Harbor Breeze ceiling fan purchase online to expedite warranty service if ever needed. Maintain documentation of your original receipt.
Balancing a Harbor Breeze Merrimack Ceiling Fan
It’s important to properly balance the blades of your Harbor Breeze Merrimack ceiling fan. An unbalanced ceiling fan can wobble, make noise, and eventually cause damage over time.
Here is a step-by-step guide to balancing your Merrimack fan:
- Turn off power to fan.
- Spin the fan blades by hand and watch the movement. Locate the blade that is dipping or wobbling the most.
- Once you’ve identified the unbalanced blade, remove the screw from its blade iron bracket.
- Install one of the small balancing weights provided onto the blade, about 1 inch from the blade tip.
- Reinstall the blade and test the spin again. Repeat steps if needed to add weights to additional blades.
- When fan rotates smoothly without wobble, ensure all blade screws are tightened properly.
- Turn power back on and use fan at desired setting. Monitor for several minutes to ensure proper balance.
With a little time and patience, you can easily balance your Harbor Breeze ceiling fan using the included weights. Contact Harbor Breeze if you need replacement balancing kits.
Harbor Breeze Merrimack Ceiling Fan Specifications
When shopping for your Harbor Breeze Merrimack, it’s helpful to understand the key specifications:
- Motor – Powerful, quiet reversible motor provides optimal airflow efficiency.
- Blades – Most models have 4 or 5 blades in 52, 56 or 60 inch blade spans to maximize air circulation.
- Blade Pitch – Adjustable 12-15 degree blade pitch allows customization of airflow levels.
- Fan Dimensions – Ceiling mounting height of 7.5 ft with 12 ft blade clearance recommended.
- Lights – Integrated LED light kits from 9W up to 20W illumination. Dimmable.
- Controls – Pull chain, wall switch, and remote control options for fan speeds and lights.
- Speeds – 3 speeds (low, medium, high settings) plus reverse modes.
- Mounting – Mounts to standard ceiling junction box with downrod/hanging system included.
- Warranty – Limited lifetime motor and 1 year on parts under normal use conditions.
- UL Rating – Ceiling fan certified under UL safety standards testing.
Review the dimensions, specifications, and requirements to ensure the Merrimack model you choose will suit your space.
How to Reverse the Direction of a Harbor Breeze Merrimack Ceiling Fan
Many Harbor Breeze Merrimack ceiling fans have a reversible motor that allows you to change the direction that the blades spin. This helps circulate air more effectively in different seasons. Here’s how to reverse fan spin direction:
- Locate the small slide switch on the upper motor housing of the fan. It will be labeled with arrows for each direction.
- Turn off power to the fan at the breaker before proceeding.
- Use a small screwdriver to slide the direction switch over to the opposite side from its current position.
- Turn power back on at the breaker.
- Use the fan’s controls to power on and check that the blade direction has reversed as desired. Monitor spin for several minutes.
- Adjust your fan speed settings for optimal seasonal air circulation.
Be sure to flip the direction switch with the power OFF to avoid damaging the motor or switch. Check manufacturer guidelines for your specific model. Most recommend reversing spin direction monthly.
Harbor Breeze Merrimack Ceiling Fan Pricing
Harbor Breeze Merrimack ceiling fans range in price from $80 on the low end up to $180 for higher-end models. Pricing varies based on the size, style, lighting features, accessories, and retailer.
Here are some examples of Merrimack ceiling fan pricing:
- 52” 4-blade indoor ceiling fan ($80 – $120)
- 56” outdoor damp-rated ceiling fan ($100 – $140)
- 60” 5-blade remote control ceiling fan ($150 – $180)
- Merrimack with LED light kit (add $20 – $50)
Extra accessories like weighted blade balances, downrod extensions, or wall controls will add $10-$30 to the total price. Compare pricing across retailers to find the best deal. Harbor Breeze fans often go on sale, so watch for ceiling fan discounts throughout the year.
How to Assemble a Harbor Breeze Merrimack Ceiling Fan
Harbor Breeze Merrimack ceiling fans provide a straightforward assembly process to get your fan installed quickly. Here are the key steps:
- Attach the mounting bracket to your ceiling and junction box using the provided screws.
- Slide the downrod through the canopy and secure with the pin and clip. Feed wires through downrod.
- Lift fan motor assembly onto bracket and make wire connections: green to green, white to white, black to black.
- Align the downrod ball shape with the mounting slot and tighten screws securely.
- Loosen blade screws and attach blades to blade arms slotting into place. Tighten screws firmly.
- Attach optional light kit by connecting plugs and securing with screws. Add light bulbs.
- Slide canopy up to ceiling and secure with screws. Align trim ring.
- Restore power and test fan speeds with remote and pull chain switches. Enjoy your new Harbor Breeze!
Always follow included directions closely. Proper assembly is key to safe ceiling fan installation and quiet performance. Call customer support with any issues.
Common Problems With Harbor Breeze Merrimack Ceiling Fans
The Harbor Breeze Merrimack earns high marks from most consumers, but there can be occasional issues as with any machine. Here are some of the most common problems reported:
- Wobbling, unbalanced blades
- Clicking noises from motor
- Ceiling fan light flickering or burning out prematurely
- Remote control connection problems or failure
- Pull chain switch jams or breaks
- Fan speeds not working consistently
- Mounting bracket coming loose over time
- Vibrations felt when fan running at higher speeds
- Fan slowing down, motors wearing out
Many minor issues can be addressed with troubleshooting steps outlined in the user manual. Other problems may require replacement parts which are available through Harbor Breeze support. More serious issues will need professional service. Be sure to keep your receipt as proof of purchase for any warranty-related issues.
How to Change the Speed on a Harbor Breeze Merrimack Ceiling Fan
Harbor Breeze Merrimack ceiling fans have several options to control the fan speed settings:
Pull Chain – Locate the retractable pull chain switch near the fan motor housing. Gently pull the chain to cycle through the speed options of high, medium, low, and off.
Remote Control – Use the provided remote to press buttons matching the fan, light, speed level, and power icons. Point remote at fan receiver.
Wall Control – If wired for a wall control, use the fan speed setting buttons on the control panel typically installed on your wall switch.
App Control – Some models can connect to the Harbor Breeze app for smartphone/tablet control.
Voice Control – Compatible smart fans can be controlled through voice assistants like Alexa when paired with a device.
Start on low speed and gradually increase to desired airflow. Be sure all components are installed correctly for speeds to function properly. Contact Harbor Breeze support if issues arise with your speed settings.
Are Replacement Parts Available for Harbor Breeze Merrimack Ceiling Fans?
Yes, replacement parts are available for Harbor Breeze Merrimack ceiling fans through Harbor Breeze support services. Some common replacement parts include:
- Fan blades
- Mounting bracket
- Blade arm screws
- Light kits
- Glass shades
- Pull chain switches
- Remote control and receiver
- Capacitor
- Balancing kit
- Downrod extension
Harbor Breeze has detailed instructions for replacing most fan parts on their product support website. They also offer live chat and phone assistance for DIY repairs and parts identification.
If needed parts are still under warranty, they will provide warranty service by sending new replacement parts free of charge after claim review. Make sure to have your product receipt on hand when requesting replacements.
Using OEM Harbor Breeze parts ensures proper fit and performance. Avoid third party parts that can hinder safety or void the warranty.
How to Control a Harbor Breeze Merrimack Ceiling Fan With Remote
Harbor Breeze Merrimack ceiling fans equipped with a remote control offer easy speed and lighting adjustments right from your sofa or bed. Here are some remote control tips:
- Point remote directly at fan to send signal. Stand within 30 feet.
- Slowly cycle through all speeds to identify speed settings. Medium is often the ideal comfort level.
- Use the “Reverse” button to change spin direction based on seasonal cooling needs.
- Turn lights on/off or dim using the corresponding buttons on the remote.
- Press the fan power button repeatedly to turn off fan when not in use to save energy.
- Check that the battery in the remote is fresh and properly installed if having issues.
- Resync remote if it loses connection by cycling power off/on at the breaker. Then press and hold the “Set” button on remote pointed at fan for 10+ seconds.
With the convenience of the remote, you can easily control fan speeds and lighting whenever needed without any pull chains.
What is the Airflow Efficiency of a Harbor Breeze Merrimack Ceiling Fan?
The Harbor Breeze Merrimack ceiling fan delivers excellent airflow efficiency:
- Blade Design – The aerodynamic blade shape and large surface area improve air circulation.
- CFM Rating – Models rates from 5000 to 5500 CFM (cubic feet per minute) indicate strong airflow.
- Motor – Powerful reliable motor provides high torque and superior airflow velocity even on low speeds.
- Pitch Adjustment – Customizable blade pitch helps angle blades for maximized airflow range in all room shapes and ceiling heights.
- Mounting Height – Installation closer to 8 feet on higher ceilings allows for greater airflow coverage that reaches walls and windows.
- UL Rating – Certification demonstrates the Merrimack meets strict requirements for air volume efficiency.
Proper sizing, installation, and maintenance will ensure your Harbor Breeze ceiling fan maintains optimal airflow efficiency throughout its lifetime. The Merrimack is built to move air effectively and quietly on all speed settings.
How to Wire a Harbor Breeze Merrimack Ceiling Fan
Proper wiring is crucial to safely installing your Harbor Breeze Merrimack ceiling fan. Here are some key wiring tips:
- Shut off power at the breaker before wiring. Use a non-contact voltage tester to confirm.
- The fan requires a grounded electrical supply wire with a separate switched hot conductor in the ceiling junction box.
- Connect wires matching colors – white to white, black to black, green grounding to green grounding wire.
- Use included pliers and wire nuts to securely connect wires. Wrap clockwise and tighten wire nuts firmly.
- Ensure no loose copper strands are exposed outside of wire connectors. Tuck all wires neatly into the canopy base.
- There must be 3 inches of wire lead length for connection to the supply wires in the electrical box.
- Attach the canopy to the mounting bracket to enclose wires. The canopy must be safely installed and secured.
- Some models may require wiring a wall control or remote receiver. Follow included diagrams.
- Restore power and test all fan functions before completing installation.
Refer to the Harbor Breeze manual for full wiring details. Contact a professional electrician if you have any uncertainty when wiring your new ceiling fan.
How to Register a Harbor Breeze Merrimack Ceiling Fan for Warranty
It’s quick and easy to register your Harbor Breeze Merrimack ceiling fan. This registers your warranty and creates a record of your purchase.
Online Registration
- Go to harborbreeze.com and find the Product Registration link.
- Enter your Merrimack model number and serial number along with your contact info.
- Attach a copy of your receipt showing the purchase date and retailer.
- Accept the terms and click submit to complete your registry.
Mail-In Registration
- Locate the postage-paid warranty registration card included in your product literature.
- Fill out all fields on the registration card for your fan and contact details.
- Tape a copy of your original purchase receipt to the card.
- Drop the completed card in the mail to Harbor Breeze.
Registering ensures you’ll have documentation on hand for quick warranty service if needed down the road. You’ll also receive updated info and special offers from Harbor Breeze.
What is the Energy Usage of a Harbor Breeze Merrimack Ceiling Fan?
Harbor Breeze Merrimack ceiling fans are designed for energy efficiency:
- LED lighting – Energy saving integrated LED light kits use 75% less power than incandescent bulbs. Dimmable for greater efficiency.
- DC motor – Advanced DC motor technology reduces energy consumption up to 70% compared to AC motor ceiling fans.
- Variable speeds – Multiple speed settings allow you to adjust airflow to match cooling needs and avoid overuse.
- Timer controls – Programmable remote and app controls allow you to set timers to turn off fan when not needed.
- Smart technology – Some models integrate with smart home tech and apps to automatically adjust fan use based on conditions and usage patterns.
- Energy Star – Select Merrimack models meet strict Energy Star efficiency guidelines for low power consumption.
- Cost per kWh – Estimated average cost to operate is only 1-3 cents per kWh, saving you substantial energy dollars annually.
With optimized components and smart technology integration, the Harbor Breeze Merrimack promotes energy savings -great for your utility bills and the environment!